Looper kit defective? Here's how you can check for problems!
If something does not work properly when using the Looper Kit, there can be various causes. We will show you how to proceed in such a case in order to localize the error and, in a perfect world, eliminate it. First, we check the Looper Kit itself to ensure that it is working properly and then look at other possible sources of error.
Check Looper Kit
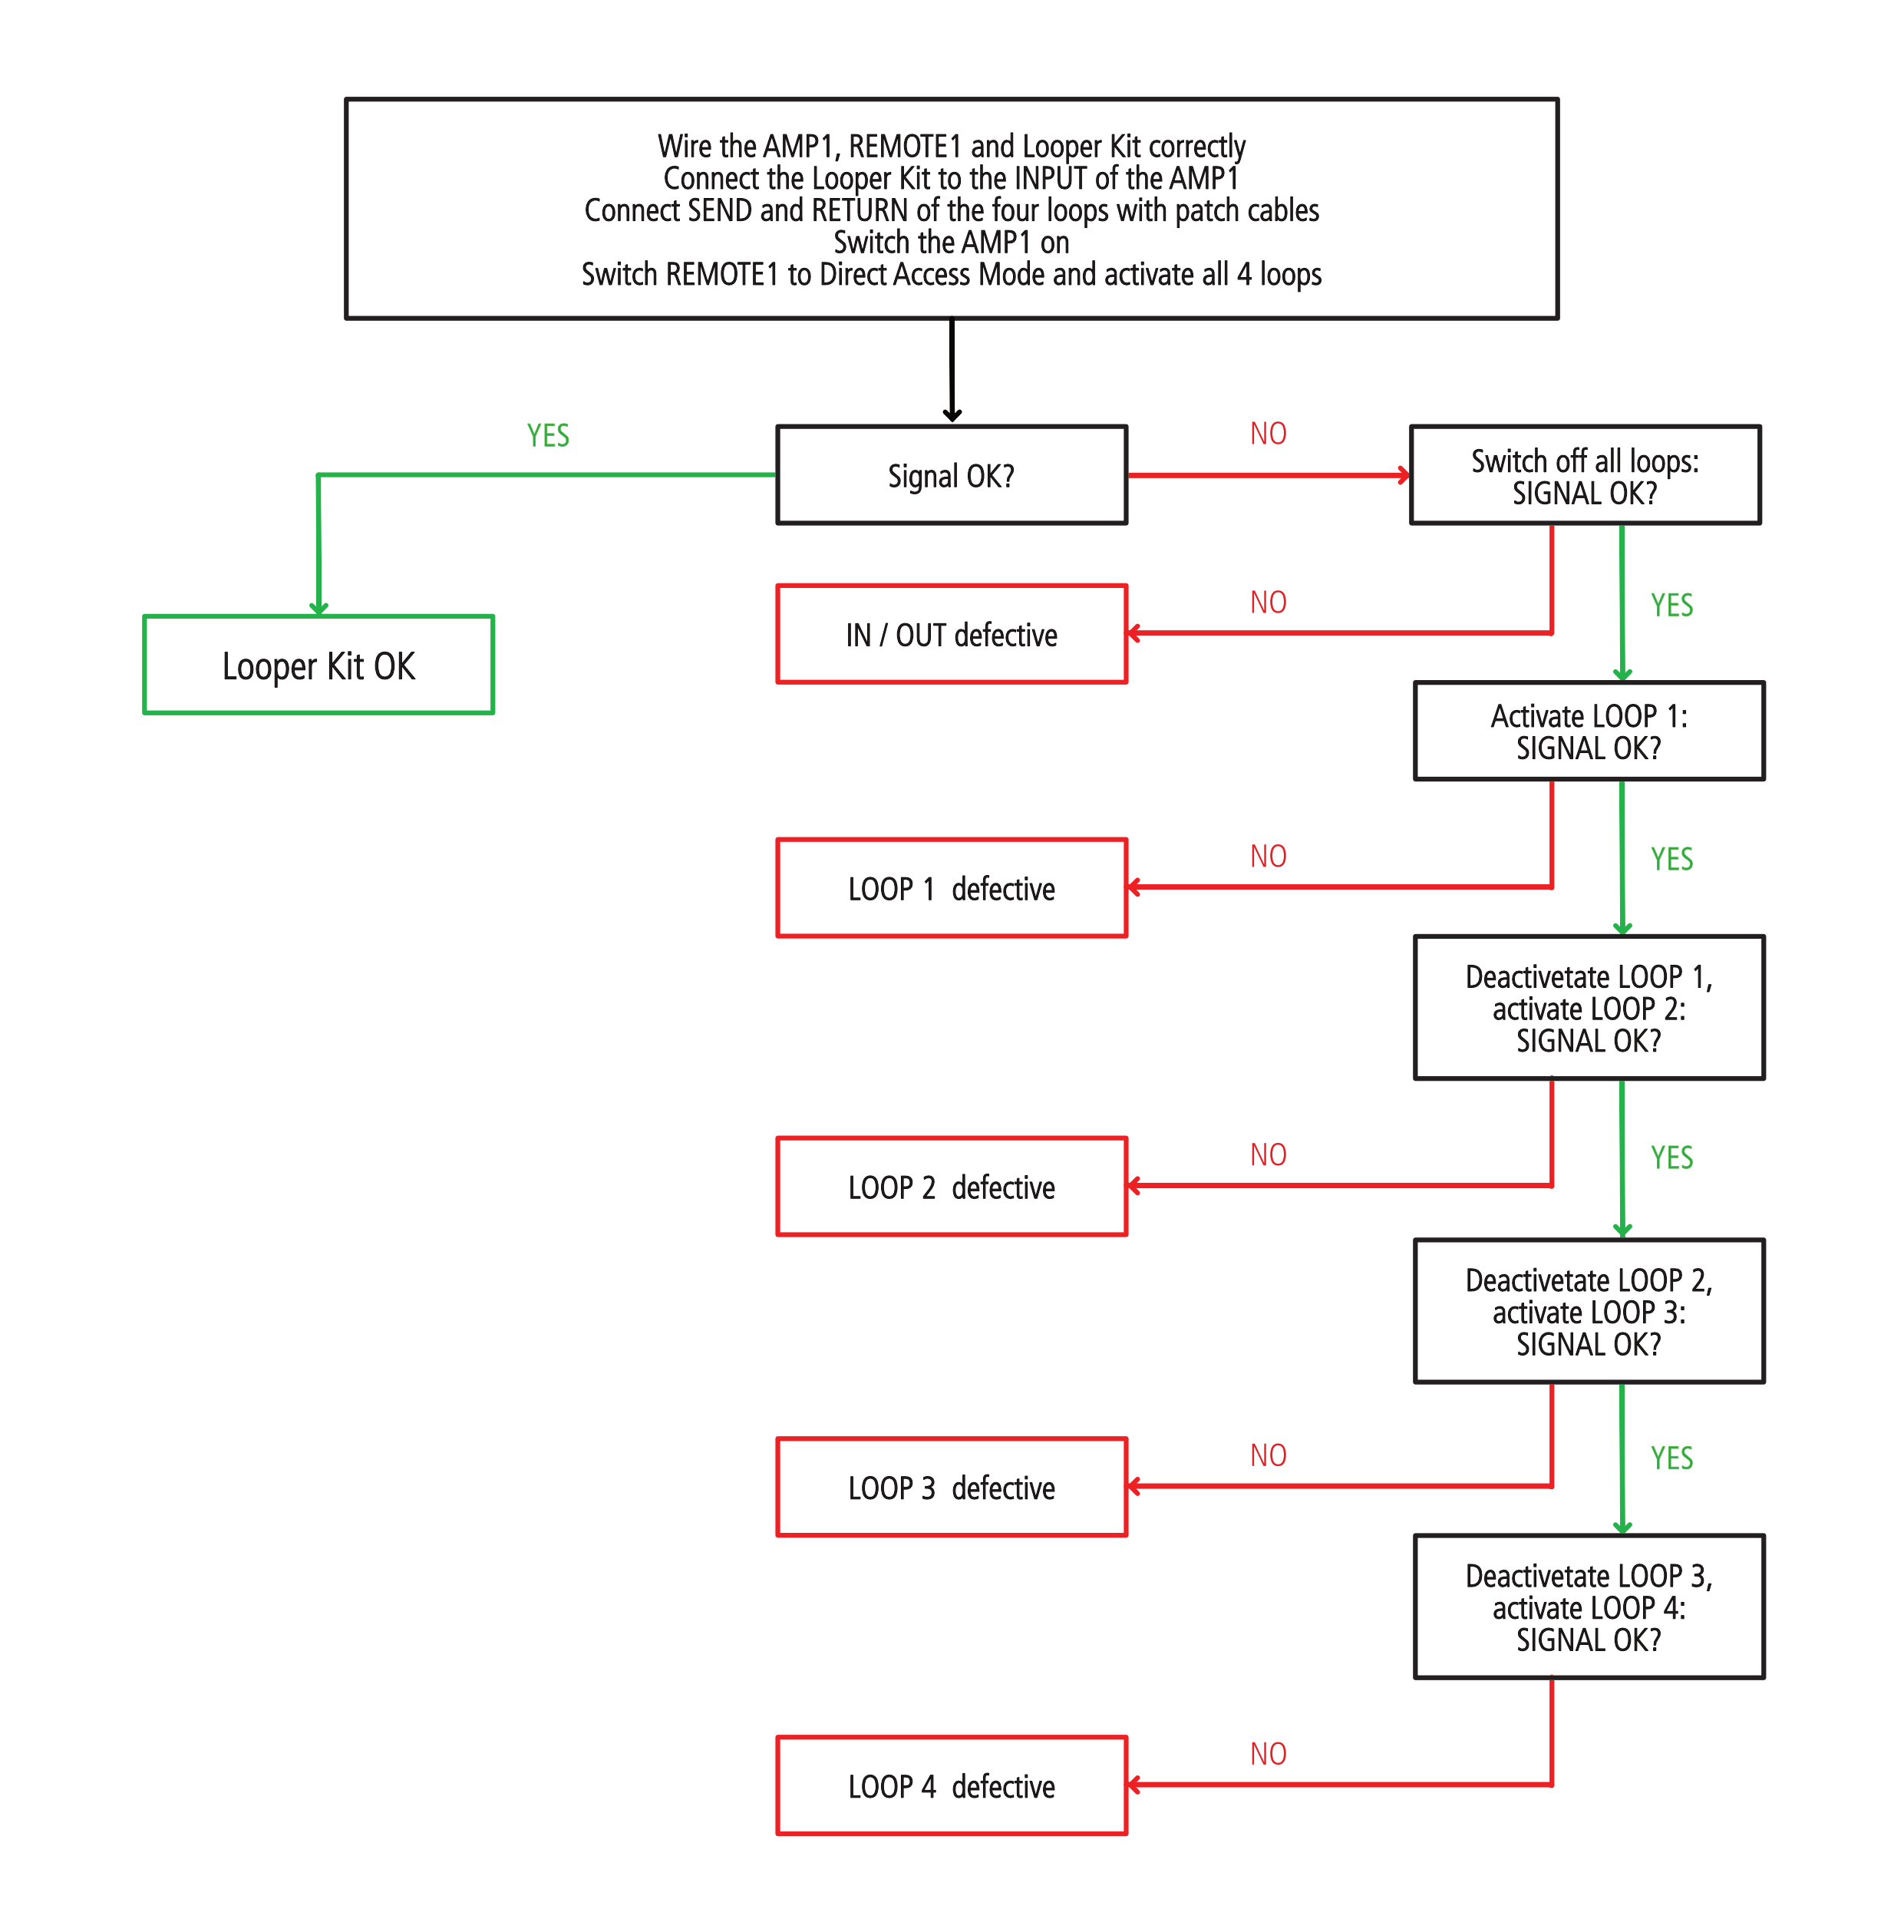
To verify that the Looper Kit is working properly, please do the following:
- First switch off AMP1 and remove all FX devices from the signal path. It is best to unplug all cables from the Looper Kit, the REMOTE1 and the AMP1.
- Next, connect the AMP1 to your guitar cabinet and your guitar to the INPUT of the AMP1, switch on the amp and check that it works properly. Then switch it off again and unplug all the cables. Make sure all the cables you use for the following steps are working properly!
- Connect the Looper Kit to the REMOTE1 (see here: Wiring the Looper Kit correctly) and the REMOTE1 to the AMP1.
- Connect your guitar to the INPUT of the Looper Kit and the OUTPUT of the Looper Kit to the INPUT of AMP1.
- Connect the SEND and RETURN of the four loops of the Looper Kit with a patch cable each.
- Turn on the AMP1.
- Switch the REMOTE1 to Direct Access Mode (the MODE/STORE button will not be lit up) and activate all 4 loops of the Looper Kit by pressing and holding button 7 (FX LOOP) until it flashes. Then, using buttons 1 to 4, activate the loops.
Signal OK? Looper Kit OK!
Now when you play your guitar you should have a signal and it should sound the same as when you checked the AMP1 for functionality. If this is the case, the Looper Kit is working and the cause of your problem lies elsewhere (see below)!
No signal? Locate the cause!
If you don't get a clean signal, you should check the function of the loops in the Looper Kit individually. To do this, first turn them all off and then turn them on again, one after the other. Since the Looper Kit hardware bypasses deactivated loops (being true bypass), you can localize the source of the error perfectly:
- Disable all 4 loops by holding button 7 (FX LOOP) until it flashes, and then use buttons 1 through 4 to disable all of the loops. If you now have no signal, the problem is with the INPUT or OUTPUT of the Looper Kit.
- If the signal is OK, then activate the first loop. Hold down button 7 (FX LOOP) and switch on the loop with button 1. If the signal stays clean, the loop is fine. If the signal breaks off, the loop is faulty.
- Disable the first loop and enable the second. Hold down button 7 (FX LOOP), switch off the first loop with button 1, and switch on the second loop with button 2. The same applies here: if the signal is OK, the loop is working. If the signal breaks off, the loop is faulty.
- Repeat this procedure with the remaining two loops. Please activate them one by one and make sure that only one loop is active at a time.

Check completed successfully - what now?
If your check showed that the Looper Kit is OK, your problem is unfortunately not yet solved. Therefore, below are a few more tips for further troubleshooting.
And of course we can also give you further help in case the Looper Kit actually has an error:
The Looper Kit is fine - further troubleshooting
If the Looper Kit itself is not the problem, the list of possible sources of error is long: faulty cables, poor-quality plugs, inferior loop-in effects, bad or incorrect power supplies for powering the external effects, phase cancellations, defective FX devices, etc.
To pinpoint the cause, check all of the external FX devices individually and bring them into the signal gradually. If you have identified a device as a culprit in this way, please find out what problems can occur with the device in question and how to fix them.
These articles may also help you:
- Muddy sounding FX device in serial FX Loop
- Thin-sounding effects device in the parallel effects loop
I discovered a defect with the Looper Kit
Known error: misprints!
There are a few Looper Kits on the market that have the breakout box mislabeled. IN and OUT as well as SEND and RETURN of the four loops are swapped around in these parts. If you are dealing with such a Looper Kit, you will notice this at the latest in the second check step (see above): REMOTE1 and the Looper Kit are connected correctly, all 4 loops are deactivated, and you still have no signal. In that case you just have to swap the cables: from IN to OUT and vice versa and from SEND to RETURN and vice versa.
Jack(s) corroded?
Sometimes it happens that a socket corrodes slightly and as a result no signal can pass. In this case, you can remedy the situation by inserting a jack plug into the relevant socket(s) several times and pulling it out again. This will allow you to clean up the corrosion and get the bushing working properly again.
Other error: contact BluGuitar service
If all else doesn't help, you can find tips on how to proceed here: Product defective - what now?
Delete